347
347
Basic Installation
Pre-Installation Steps
-
Safety Inspection: Ensure all appliances are safe and working properly.
-
Unpacking: Inspect the GVD unit and verify all parts are included.
-
Wiring Preparation: Use 24VAC wiring, 18-gauge minimum.
Installation Procedure
-
Shut off gas and electricity to the appliance.
-
Install the GVD device after the appliance draft hood, as close to the draft hood as possible.
-
Ensure 6 inches of clearance from combustible materials.
-
Secure the GVD with sheet metal screws or pop rivets, ensuring fasteners do not obstruct the damper gate.
-
Install and connect the wiring harness as instructed in the wiring diagram.
-
Confirm the vent damper's position indicator is visible and accessible.
Electrical Wiring
-
Follow appliance manufacturer instructions for locating the vent damper harness.
-
Ensure all connections are secure and properly positioned away from heat sources.
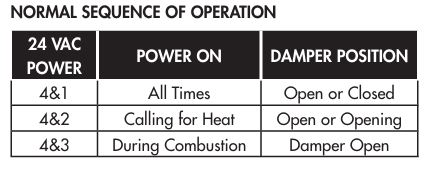
Order of Operation
-
Power On: Damper may be open or closed.
-
Call for Heat: Damper rotates to the open position.
-
During Combustion: Damper remains open throughout heating cycle.
-
End of Heating Cycle: Damper rotates to the closed position.
-
Non-Heating Cycle: Damper remains closed to prevent heat loss.
Troubleshooting Guide
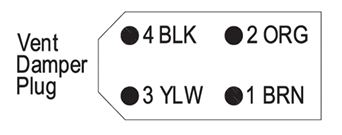
Terminal 4 - Black (Common) 24 Volt
Terminal 3 - Yellow ( End Switch Out) 24 Volt
Terminal 2 - Orange ( End Switch In) 24 Volt
Terminal 1- Brown ( Hot ) 24 Volt
No Power to Damper (Terminals 4 & 1)
-
Possible Causes:
-
Tripped limit control
-
Blown fuse or circuit breaker
-
Loose or disconnected wiring
-
Damper harness unplugged
-
-
Solutions:
-
Reset limit control or breaker
-
Replace fuse
-
Tighten or repair wiring connections
-
Plug in damper harness
-
No Power to Damper (Terminals 4 & 2) with Power at 4 & 1
-
Possible Causes:
-
Thermostat not calling for heat
-
Faulty heat anticipator or wiring
-
Tripped limit control or blocked vent switch
-
-
Solutions:
-
Adjust thermostat
-
Replace thermostat or heat anticipator
-
Reset limit control or vent switch
-
Power at Terminals 4 & 1, 4 & 2, Damper Open, No Combustion
-
Possible Causes:
-
Gas supply off
-
Loose wiring connection
-
Defective appliance component
-
-
Solutions:
-
Open gas valve
-
Tighten or repair wiring connections
-
Replace faulty appliance component
-
Damper Rotates Continuously
-
Possible Causes:
-
Defective damper motor
-
-
Solution:
-
Replace damper motor assembly
-
Damper Stuck Closed
-
Possible Causes:
-
Obstruction in damper gate
-
Bent or damaged vent pipe
-
-
Solutions:
-
Clear obstruction
-
Repair or replace vent pipe
-
Troubleshooting Using a Jumper Wire
-
Ensure the damper is in the open position.
-
Place a jumper wire between Terminals 2 & 3.
-
If the appliance fires, remove the jumper and plug the damper harness back in.
-
If the appliance does not fire, replace the damper motor assembly.
-
If a replacement motor assembly is not available, place the service switch in the hold open position to allow temporary heating operation.
See below for wire references: